Building a wood fence
Now that your fence posts are set and ready to be built on, we will start building a wood fence.
I am assuming that you cherish your time of from work and rather be golfing or doing some other fun activities than building a wood fence so we want to save you time. We are going to work in an assembly like fashion and make a jig to speed up the work and omit errors. Please check the list of materials and tools you will need to complete your fence design.
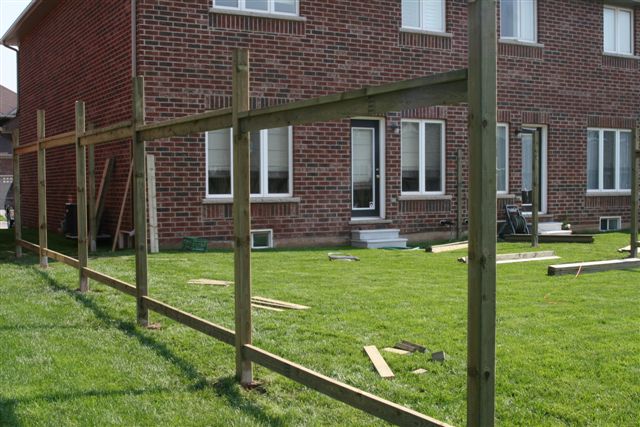
We will start building by installing the stringers. When you are building a wood fence, the style you choose may require some modification in the height positioning of stringers. There are several fence designs you can choose from. We chose a T bar fence design because it is a base for many other fence designs..
Determining the height of the mason line.
Use a fence board for height and leave a space of approximately 1½ to 3 inches between the ground and the bottom of the fence board.
After you have determined the height you will need, at your starting post and end post, mark it by hammering in a nail and tying your mason line to it stretching the line from end post to end post. Place a line level on the mason line and level out line if needed. Do this to all fence lines.
The next step in building a wood fence is to check that the height of the mason line is correct.
Take a fence board hold it under the stretched line at each fence section. The fence board should clear under the line plus the approximate space. This is done quickly. If you see that the gap is too large adjust into step-ping. Small variations don’t need to be adjusted. If your property is sloped it is best to start your stepping at the high end of the property and work your way down the slope.
Now you will make a jig for your bracket installation.
Because you are building a wood fence you can make some time saving jigs. Not only will these jigs save you time but they will keep your fence consistent and professional looking. The size of these jigs varies according to different fence designs.
Rip a fence board in half, lengthwise. From the top of this cut board measure down 3½ inches and draw a pencil mark. Start at the top of the board again and now measure down 63 inches, make a pencil mark. These marks will show you where to install your fence brackets on the post. This is the marking for a six foot high fence.
Hold your jig up at each post, with the top edge of the board just slightly brushing the line. Transfer pencil mark from jig on to post. After you marked all the posts remove mason line. You are now ready to install the 2x4 brackets.
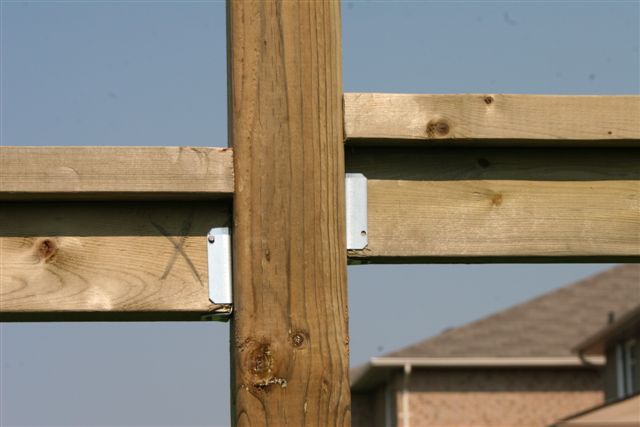
Place the bottom of your bracket on the marked line and hammer it securely into the post. Continue installing all upper and lower brackets. You can use a 2 inch or a 2½ inch nail, depending on your bracket. Brackets should be centered on the post.

Place on the ground between each post the 2x4x8 wood stringers. (3 per section)
After you distributed all the stringers, hold up each 2x4 to the place where you are installing it, mark with a pencil for cutting to size latter.
Mark an O on the top 2x4 and make your pencil mark for cutting. Place back on the ground. This is the top capping 2x4.
Next take your upper 2x4 the one that will be installed in the upper bracket. Hold it up between the posts in the area of the brackets and make a pencil mark for cutting. Mark an X on top of this 2x4.
Measure the bottom 2x4 the same way but you don’t need any identification mark on this piece.
Measure all the remaining 2x4s between each section in the same manner.
Now that you completed all your measurements you may start cutting the stringers.
The top 2x4 the one that is marked O, needs to be cut at exactly where you made the mark.

The two remaining stringers marked with an X and no mark, need to be cut about two saw blades shorter than your pencil mark. This is to compensate for the thickness of the bracket.
It is best to cut in place where your wood is at each section. A circular saw with a long extension cord would be a good choice.
If your friend is there to help you while you are building a wood fence, you can have him place the 2x4s in the corresponding brackets, and try it in place, the top 2x4, to be sure the way you measured is correct. If everything looks fine with your first section chances are you measured correctly.
You can now proceed to cutting the rest of the stringers in the same manner as the first section, and your friend can fallow behind you, placing the stringers in their right location in the brackets. Use 2 inch nails to nail the 2x4 in place in the bracket. The top 2x4 will lay flat on top of the top stringer between the posts. This you can nail in with 3 inch nails.
When everything is nailed into place your frame work is done.
To continue please click on building a privacy fence.
Helpful tips for building a wood fence.
Use hot galvanized spiral nails. The twist in the nail will hold your entire nailing firm like a screw. Hot galvanized nails won’t rust and stain your fence.
Measure twice cut once. Use a dark leaded pencil for your markings so you can easily see it. Carpentry pencil is also available.
If your fence is only five feet high the measurement for your jig will be 3½ inches and 53 inches, from top measuring down.
List of tools needed.
Mason line, line level, 2, 2½ and 3 inch hot galvanized twist nails and brackets. Tape measure, extension cord, circular saw and hammers.
If you would like to get back to the home page click on the building a wood fence link.
